Situations in which you lose all of your precious memories and photos are very rare, although it can happen. In those cases, it’s extremely beneficial to have backups of all of your Google Photo images stored somewhere safe. This guide will take you through creating automatic backups for Google Photos using Google Takeout, so you never have to worry about losing your pictures.
What is Google Takeout?
Though it sounds delicious, Google Takeout is none other than a way to export crucial data from most of your Google apps and programs. You can export anything from Google Assistant notes and lists to Drive files to Stadia game activity from Google Takeout.
The service is extremely useful for creating a backup of multiple Google apps at a time or setting up an individual backup for one app like Google Photos. You can even set automatic backups for Google Photos, which will send you a backup file every so often that you can download, keeping your saved files up-to-date.
In this case, you can use Google Takeout to export your Google Photos and save them locally on a hard drive or in a different cloud program. By doing this, you’re ensuring that your pictures from the past are safely stored somewhere, which gives a little peace of mind.
Backup Google Photos pictures with Takeout
Compared to a lot of other export tools, Google Takeout is easily one of the most user-friendly. The process is simple and generally self-explanatory, though, depending on how many images you have saved in Google Photos, could take a lot of time – even days.
Here’s how to get started:
- In Google Chrome, head to takeout.google.com.
- Click Deselect all at the top.
- Scroll down until you see Google Photos and hit the checkmark next to it.
- Click All photo albums included if you want to select certain albums to backup. Skip if you want everything in the cloud downloaded for storage.
- Scroll to the bottom and hit Next step.
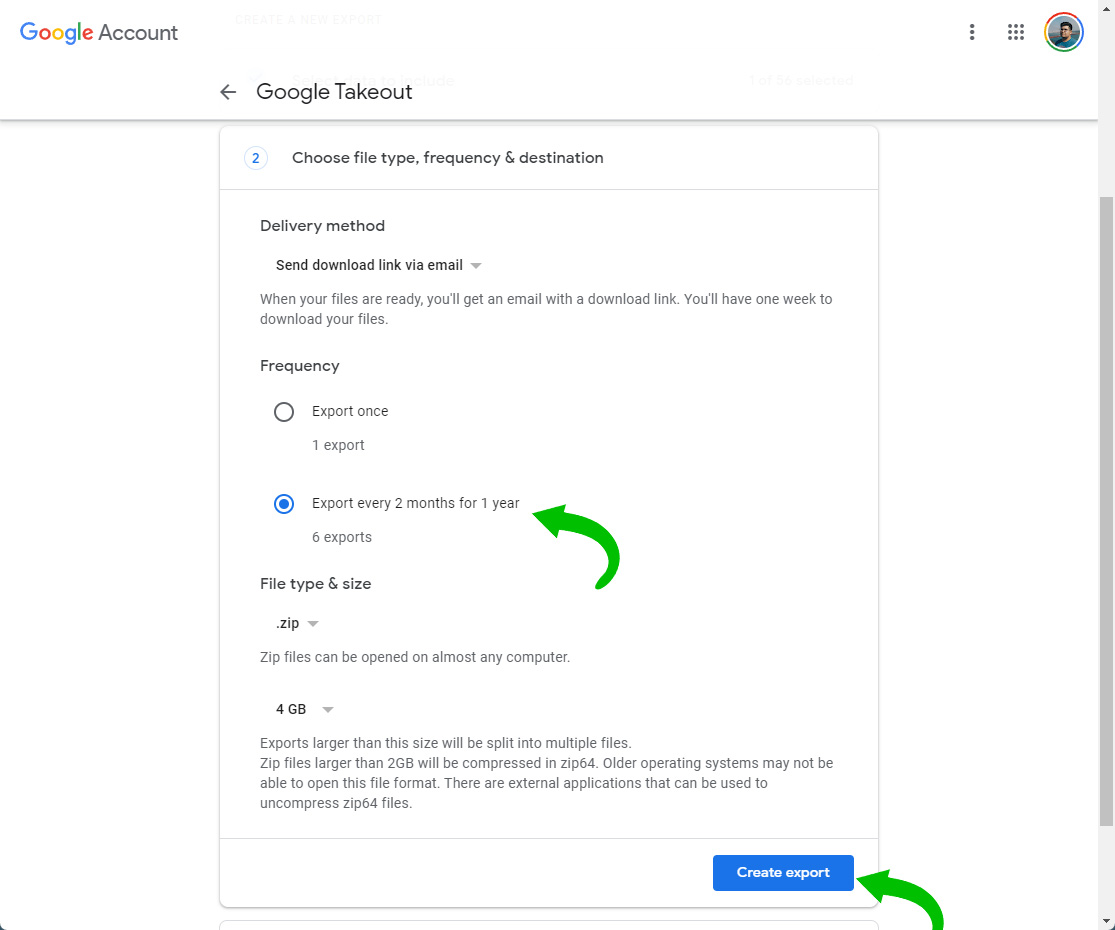
- For automatic Google Photos backup, click Export every 2 months for 1 year. For one and done, hit Export once.
- Choose your file type and size.
- Note: Size refers to the limit of each file before it splits into a new file. If you choose a low limit, you’ll end up with more individual files. This does not refer to the total amount of data exported.
- Click Create export.


That’s it! Your export will begin and soon, you’ll have an email from Google letting you know that your first automatic backup for Google Photos is ready to be downloaded. As mentioned, this could take a while if you have a lot of photos, so be patient.
Choosing the option to set an automatic backup schedule only lasts for one year. In that year, you’ll end up getting 6 different backups sent to you through Google services. Unfortunately, you’ll need to set up a new automatic backup schedule every year, though it’s better than one and done.
Automatic backups for Google Photos are great since you don’t need to worry about initializing one every so often. Though you’ll get a notification through your email or phone, you don’t have to download an export once it’s sent to you if you don’t feel you need to, either, though it’s better to be safe than sorry.
More on Google Photos:
- Google Photos renaming ‘Archive’ to ‘Hidden’ as Android shows on-device file location
- Magic Eraser ‘Camouflage’ tool in Google Photos now available for Pixel 6 and 6 Pro
- Magic Eraser on Pixel 6 series: What you can do with it and how
FTC: We use income earning auto affiliate links. More.


Comments