
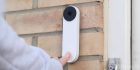
You’re tired of it, and I’m tired of it. Tired of the lack of options out there for apartment dwellers who want to deck their space out in smart home products. The Google Nest Doorbell is no different. Fortunately, we found an easy and safe way to install a Nest Doorbell in an apartment without having to drill a single hole or unpeel a single sticker.
Table of contents
Why can’t I install my Nest Doorbell the traditional way?
Apartment complexes famously have a lot of rules. Many of them share a very similar one in common: Don’t drill any holes in the outside of your apartment. Of course, that makes sense since it technically isn’t your property, and you should absolutely abide by those rules.
The Nest Doorbell comes with several pieces of hardware in order to install it. Generally, this includes drilling holes, fitting anchors, and screwing in the baseplate to a wall. Of course, that usually won’t fly in an apartment.
Apartment-friendly Nest Doorbell installation materials
Fortunately, there is a way you can completely bypass the above installation method. This method includes clamping the Nest Doorbell to the door in a manner that doesn’t damage any walls or doors. Here’s what you’ll need:
Together, you’re looking at about $215, although you can find the Nest Doorbell on sale often. The mount above is a simple alternative to fastening the Nest Doorbell to the wall and even sticking it with adhesive.

If you were to use adhesive, theoretically, a thief would have an easier time stealing the Nest Doorbell off your door or wall. Also, you run the risk of the adhesive degrading and falling off, possibly breaking your $180 doorbell.
The Nest Doorbell has an estimated two months of battery life, which means you won’t need to constantly charge it over USB-C. You don’t even need to loosen the mount from the door. Simply use the tool that comes with the Nest Doorbell to pop it off and you can charge it in your apartment.
How to install your apartment-friendly Nest Doorbell
After getting both items, it’s pretty straightforward to install your new Nest Doorbell. Here’s how to install your Nest Doorbell in an apartment:
- Unpack the mount and set it aside.
- Unpack the Nest Doorbell and start charging it with the provided cable.
- Decide if you want to use the 20-degree wedge for a better angle of your door. If you do, take two of the small screws from the Nest Doorbell box and set them aside. If you don’t, gather two screws from the mount’s box and set them aside.
- If using the wedge, screw it into the mount with the two longer screws from the Nest box. If not, screw the baseplate directly to the mount with the screws that came with the mount.
- Pay attention to the orientation of the wedge. You generally want the wedge angle facing away from the mount, not toward.
- If using the wedge, screw the baseplate to the wedge with the two smaller screws that came with the mount.
- Once the Nest Doorbell is fully charged, attach it to the baseplate.
- Slip the mount onto your door and tighten the pressure screw on the backside.


That’s it! You now have a Nest Doorbell that doesn’t screw in and is safe from removal, provided you use the small extra metal tab to cover the Nest Doorbell’s removal slot.
The wedge is a helpful addition if you want to keep your doorbell from capturing footage in your neighbor’s apartment, or if you want to get a better view of those in front of your door.
Note: Absolutely check with your landlord or management before trying this process. In general, this isn’t frowned upon and is an acceptable modification, but it’s better to be safe than sorry.
More on Nest devices:
- How to change your Nest Doorbell ringtone
- Nest Doorbell gets a trio of ringtones to celebrate July 4th
- Nest Doorbell alerts rolling out to Pixel’s At a Glance widget
FTC: We use income earning auto affiliate links. More.


Comments