Google has a lot of ways for users and developers to test the latest Android builds. In 2024, that is Android 15. The update has finally arrived, and you can flash it or wait for the OTA. If you get problems or simply don’t like the latest update then here’s how to downgrade from Android 15 back to Android 14 on your phone.
In the interest of helping you resolve problems, this guide is aimed specifically at Android 15. All links and information are related to the latest Android build. We have several guides for older versions that offer help and advice on downgrading your Android phone as required. You can find them here:
- Android Basics: How to sideload OTA updates on your Google Pixel [Video]
- How to downgrade from Android 14 back to Android 13 on Google Pixel [Video]
- How to downgrade from Android 13 back to Android 12 on Google Pixel [Video]
Full transparency: All of those guides are almost identical to what you are about to read. The core process has not changed since 2016, but it does include some foolproof methods that Google has added over the years to help those who found it difficult or confusing. The Android Flash Tool makes it super easy to flash factory images on your Pixel without messing around with this process.
If you want to know how to install or sideload Android 15 on your phone, tablet or foldable then we have a handy guide that goes over all the basics. The process hasn’t changed in over a decade. Also, if you want to know just what Android 15 brings to the table you should check out our deep dice below:
Another thing to note is that due to the various support windows for the Google Pixel series, Android 15 will only officially be available for the Pixel 6, Pixel 6 Pro, Pixel 6a, Pixel 7, Pixel 7 Pro, Pixel 7a, Pixel Fold, Pixel Tablet, Pixel 8, Pixel 8 Pro, and recently released Pixel 8a. The upcoming Pixel 9 series will likely ship with Android 15, so it won’t be able to downgrade to Android 14 once those devices hit store shelves.
While you may be fine running Android 15, the previous Developer Preview and Beta builds, being able to go back to stable Android 14 might be required to squash some bugs or restore stability on your phone. As nice as this option is, there are some limitations to all of our listed methods.
Backup your data
You must back up all of your data before even attempting this. You WILL lose your device data, as this method requires a FULL device wipe, and it will be wiped several times during this process.
Quick method 1 : Unenroll from the Beta (if still enrolled)
Unenrolling from the beta is a super quick way to get your phone back to the stable update channel during the public preview phase. This will work if you have enrolled and haven’t yet updated to the stable OTA. The dedicated Android 15 Beta page will show any devices eligible to join the public preview and allow you to opt out of future updates.
Just tap the “Opt out” button and this will send an OTA update to your device. However, this OTA will fully wipe all of the data on your phone and then install the latest public or stable version of Android.
If you are running any developer preview builds on your Google Pixel, sadly, this quick method is not available, but you will see a notification to confirm this. If you are running a developer preview build, you’ll need to use this guide.
Quick method 2: Use the Android Flash Tool
The quickest manual method to downgrade your phone from any version of Android to another supported version on your device is to use the Android Flash Tool. It works from your browser and requires just a few simple things from you. Skip to Step 6a of this guide to get started.
Table of contents
- Backup your data
- Quick method 1 : Unenroll from the Beta (if still enrolled)
- Quick method 2: Use the Android Flash Tool
- 1. Download and install Android SDK Platform-Tools package
- 2. Enable USB debugging and OEM unlocking
- 3. Download the Factory Image for your device
- 4. Boot into device bootloader
- 5. Unlock the bootloader
- 6a. Enter the flash command
- 6b. Access the Android Flash Tool
- 7. Relock the bootloader (optional)
- 8. Reboot your phone
1. Download and install Android SDK Platform-Tools package
You’ll need a tool called ADB (Android Debug Bridge). To use ADB easily, download the platform-tools package on your computer and unzip it. This will give you quick access to the necessary commands. You can download the latest platform-tools zip file from here.
Alternatively, Nexus Tools from Corbin Davenport offers a very simple way to ensure that you have the very latest version of Platform-Tools on your Windows, Mac, or Linux machine at all times. Nexus Tools has been written in Dart, so it can run on Linux, macOS, Windows, Windows Subsystem for Linux, and Chrome OS. Once Nexus Tools is finished, you can run adb, fastboot, and other commands with zero problems or issues.
We highly recommend using Nexus Tools if you are using an M-series Mac. Problems can arise with the PATH file and this negates any issues that a novice might encounter.
2. Enable USB debugging and OEM unlocking
Firstly, before we can initiate any other portion of the Andoid 15 downgrade process you’ll need to ensure that you have Developer Options enabled on your Pixel. You can do that by heading to your device Settings > About phone, now tap “Build number” until a message confirms that you have Developer options enabled.
Now you need to head to Settings > System > Advanced > Developer options (you may need to expand a hidden menu for this). Before we are ready to continue, you will need to scroll down and enable “OEM unlocking” as this is integral for further steps. Now scroll slightly further down to the “Debugging” section and tap the “Allow USB debugging” option.
3. Download the Factory Image for your device
Downgrading to Android 15 requires a Factory Image for your specific Pixel phone. Think of it as a complete software reinstall, containing all the files needed for that exact Android version. Luckily, Google provides them all on their Factory Image OTA hosting site.
You will need to add this file and unzip its contents to the platform-tools folder for later access.
Note: Do not extract into an internal sub-folder, just extract all files into the main platform-tools folder.
4. Boot into device bootloader
This can be done in a couple of ways. The simplest way is to connect your device to your Windows PC and open the platform-tools folder and type “cmd” into your file manager address bar, then press the Enter key. This will open a Command Prompt window in the right place.
On Mac, right-click on unzipped platform-tools folder and in the mini-menu click Services > New Terminal at Folder.
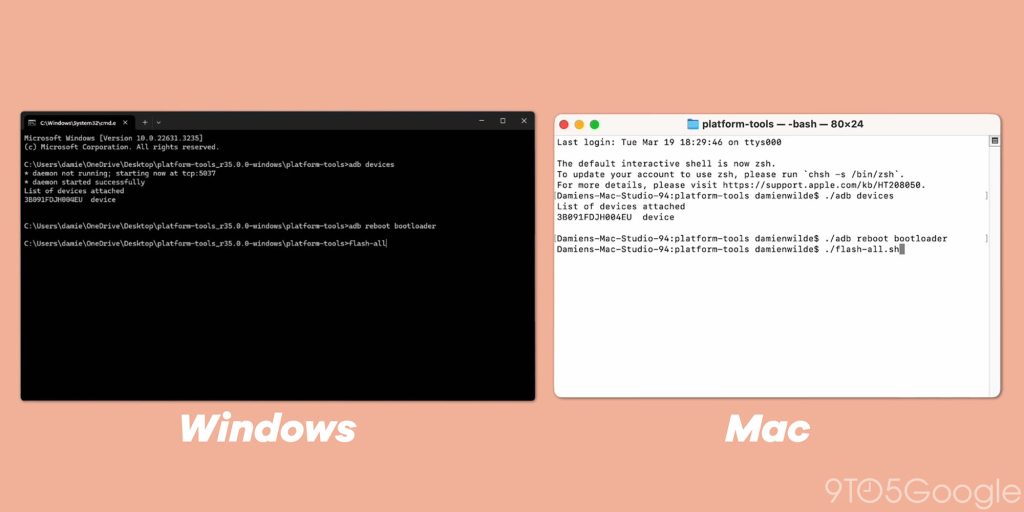
Test if your device is connected and recognized by your PC or Mac by entering the following command:
Windows:
adbdevicesMac: ./
adbdevices
The Device ID will be listed if your Pixel is connected successfully. This can be helpful at identifying cables that are not safe for this process. With your device fully connected, enter the following command to start the adb daemon:
Windows:
adb reboot bootloaderMac: ./
adb reboot bootloader
Your Pixel device will now load into the bootloader, which is where we’ll need to be to send some commands.
Alternatively, you can press and hold the Power button and volume down key until you see the Android figure lying down. Now you will need to press and hold the power button and volume up button briefly before releasing the volume up key. Using the up and down volume buttons, you can scroll to select “enter fastboot.”
5. Unlock the bootloader
To downgrade from Android 15 to an older build using a Factory Image, you’ll need to unlock your phone’s bootloader. Unlike the simpler ADB sideloading method, flashing a Factory Image requires this extra step. This is a pretty simple process, though. When using your command-line interface, enter the following command:
Windows:
fastboot flashing unlockMac: ./
fastboot flashing unlock
You will get a slightly daunting message on your display warning you that unlocking the bootloader may cause device instability. Using the physical volume keys, choose the “Unlock the bootloader” option and confirm your selection by pressing the power button. Restart your Pixel, as this process will wipe your smartphone.
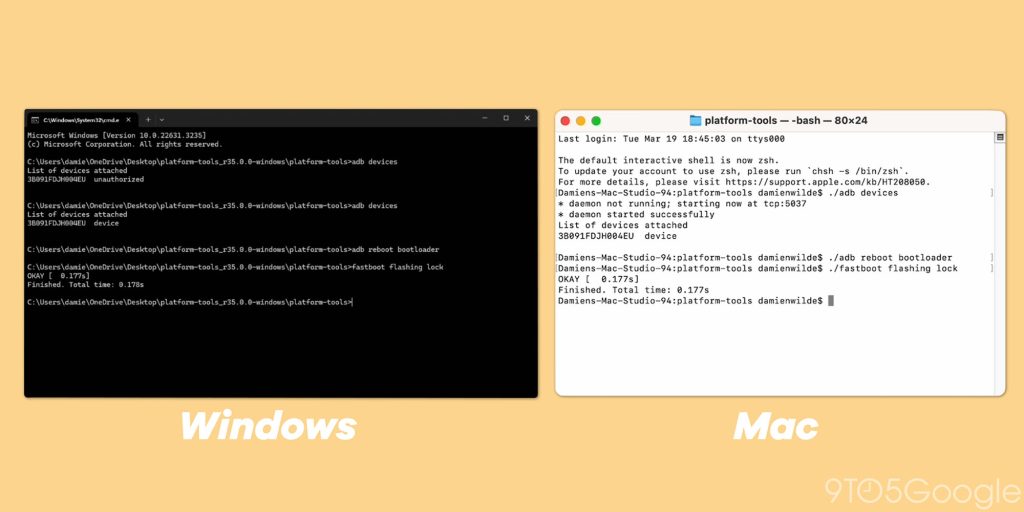
We will also need to skip the device startup process to re-enable USB Debugging in preparation for the next step. Once you have done so, ensure your Pixel is connected to your PC, and you’ll need to enter the bootloader on your device with the following command again:
Windows:
adb reboot bootloaderMac:
./adb reboot bootloader
6a. Enter the flash command
With all of your Factory Image files extracted into the platform-tools folder and accessible. You can now run the following command (with your open Command Prompt/PowerShell window):
Windows:
flash-allMac:
./flash-all.sh
Please note that M-series Macs can encounter issues with this method as noted. You can attempt to resolve this by using a USB hub and connecting your device. However, we recommend using the Android Flash Tool method when using an M1, M2, or M3-powered Mac device unless you install Nexus Tools.
Your Pixel will now begin the process of downgrading Android 15 Developer Preview back to Android 14, which can and will take a few minutes. Leave the Command Prompt window open and when the process has finished, you will see a completion message.
6b. Access the Android Flash Tool
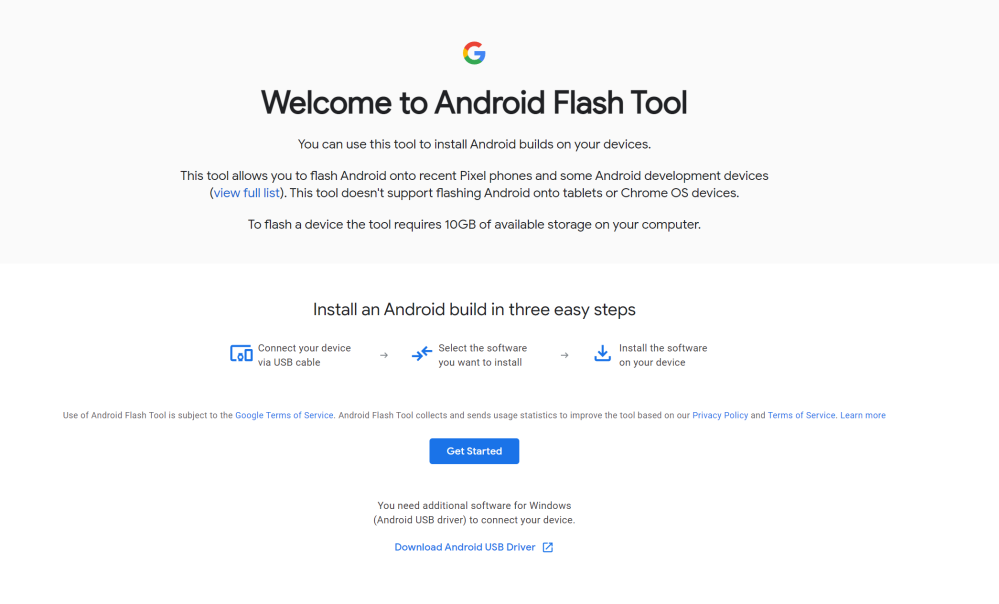
For a simpler downgrade experience from Android 15, try Google’s Android Flash Tool. It works directly in your Chrome browser, replacing complex command lines with a user-friendly interface. Downgrading with this tool is a breeze if you’ve completed the previous steps – but those steps are unnecessary as the tool can automate this process.
Connect your Pixel to your computer via USB-C cable and head to the dedicated firmware page for your specific device. You can find the direct links for all eligible devices below:
- Pixel 6 (“oriole”
- Pixel 6 Pro (“raven”)
- Pixel 6a (“bluejay”)
- Pixel 7 (“panther”)
- Pixel 7 Pro (“cheetah”)
- Pixel 7a (“lynx’)
- Pixel Fold (“felix”)
- Pixel Tablet (“tangorpro”)
- Pixel 8 (“shiba”)
- Pixel 8 Pro (“husky”)
- Pixel 8a (“akita”)
Find the right build or the build that you desire for your specific handset and click the “Flash” link, which is found alongside the build “Version.” Doing this will now launch the Android Flash Tool page, and the firmware you have chosen will automatically be loaded and ready to be installed on your device.
Tapping the “Get Started” button will initiate a pop-up you will need to accept to allow ADB access. This also means that your Pixel will be able to communicate with your computer and the downgrade process from Android 15 back to Android 14 (or another available software build) can commence.
A new page will appear explaining the steps (which we have detailed above). From here click the “Add a new device” button and provided that your smartphone is connected and in the prerequisite Recovery mode, it should be recognized. Select your Pixel and double-check if the software build is the one you want to install. Also from here, you can relock the bootloader without needing to use command line too — saving time as part of this process. If you’re happy click “Install” and then “I accept” when the “License Agreement” dialog box appears.
This installation process should now take a few minutes, but ensure that your device is securely connected and does not disconnect during this process. You’ll be greeted with a new page that confirms “Software successfully updated” while your Pixel should now boot into the software that you have selected.
7. Relock the bootloader (optional)
This is an optional step but is needed if you want to get future OTA updates.
If you choose to avoid locking the bootloader after downgrading Android 15, you’ll see a pop-up splash screen with a warning each time you reboot your device.
For those using the Android Flash Tool, there is a neat toggle that will take care of this for you (as noted above). If you have done this already, you can skip this step entirely.
You will need to go through the device setup process again, which you can skip wholesale. From here, go back and re-enable USB debugging from step No. 2 — your bootloader is unlocked so OEM unlocking should be grayed out.
Plug your device back into your Windows PC and open your platform-tools folder and reopen a Command Prompt window using the “cmd.” Enter the following command to quickly load into your device bootloader:
Windows:
adb reboot bootloaderMac:
./adb reboot bootloader
Now we can re-lock the bootloader by entering the following:
Windows:
fastboot flashing lockMac:
./fastboot flashing lock
On your Pixel, using the volume keys, scroll to the “lock the bootloader” option and tap the power button to accept. When confirmed, “locked” will appear on screen within the bootloader menu.
Note: This process will wipe your device a further time once you reboot your Pixel.
8. Reboot your phone
Downgrade complete! Disconnect your device and reboot. You’ve successfully returned to Android 14 (no more Developer Preview, Beta, or even the stable Android 15). After a quick setup process, you can enjoy your familiar and stable Android experience again.
If you have or encounter issues, be sure to try a different USB-C cable. In some cases, we have seen complaints from people using USB-C to C cables. In most cases, we have found that USB-A to C cables are more reliable, but that depends on whether you use Windows or Mac OS. On some M-series Macs, you may also need to bridge the connection with a USB-C hub or something similar. Often, plugging directly into your machine can be problematic with no direct fix that we are currently aware of.
You can also use this process tot to downgrade from Android 15 to even older builds on compatible Pixel phones. So long as your phone shipped with an older operating system, it is possible to go back to an older build.
However, there’s an important exception for Pixel 6, 6 Pro, and 6a due to anti-rollback security measures. These phones can’t downgrade back to Android 12 without some workarounds, even if that’s the operating system they officially shipped with. Once you update to Android 13 or later, you won’t be able to go back to Android 12 on the Pixel 6 series. The good news is that this limitation applies only to these specific Pixel models. Downgrading to older supported versions is generally possible for all other Pixel devices. You can read the full explanation for this Pixel 6 limitation below:
We do not recommend rolling back devices to older builds unless you have no other option. This can bring about various device security risks and further potential device issues. That said, if you do choose to downgrade from one Android version to another, then you do so at your own risk. On older builds, the Pixel 4 will also lose access to Face Unlocking should you go back from Android 11 to Android 10.
FTC: We use income earning auto affiliate links. More.


Comments